The XML code above is for a single paragraph and conforms to DeltaXML’s own DeltaV2 format; this format describes each change using a deltaV2 attribute which uses ‘=’ and ‘!=’ tokens to separate revisions that agree or do not agree. As an XSLT developer, I found this format (once I had got used to it) quite compelling in that it uses a very simple notation to describe a set of potentially complex changes. Unfortunately however, the end-user is unlikely to appreciate this view, so its time to see what else can be used:
Side-By-Side
Before going on to design a possible solution for our scenario, let’s look at how code-merging tools work in general: The merge tools used in revision control systems tend to present a side-by-side view, with the original view shown in the middle and the two modified version views shown on either side. The following sketch shows a rough view of this, a close-up is shown immediately below:


A conventional side-by-side comparison for a 3-way merge.
The above view works well for code changes, but there are a number of factors that make this unsuitable for the scenario we’re covering here:
- Only 2 revision documents (and the original) can be considered at a time
- Line-by-line comparison is ineffective with the unrestricted line-lengths often found in XML
- The tags and attributes of the raw XML reduce the readability of the document
Ideas for a new alternative
Let’s now look at some possible requirements for an alternative solution designed specially for reviewing document revisions:
- A WYSYWIG view of the changes (even if only approximate) is necessary because the average end-user finds this much more readable than raw XML.
- There is a lot of information to show, so, to prevent clutter, the view should be dynamic and only show the context information
- The position of selected content within the DITA XML tree should be shown if required
- The owner(s) of selected content should be shown
- It should be possible to review contributions from all reviewers alongside each other, to understand conflicts.
- Selecting a reviewer-group should result in the highlighting of all revisions made by that group
- Visual clues should help differentiate between text and element-level changes
- The user should be able to ‘drill-down’ through the tree of a selected part of a document
- Changes to attributes should be represented in the view
- It should be possible to navigate a list of all the changes found
Views from the prototype
[UPDATE]
Since I first wrote this blog, the prototype has been rewritten to be a functional demo web app XMLFlow with a simpler UI. It provides a few more features – most importantly with respect to accepting or rejecting changes:

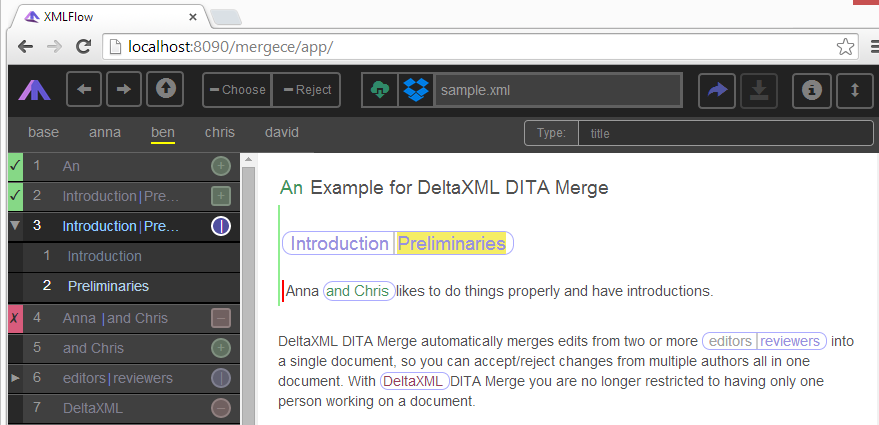
XMLFlow: A document review web app
Please note that this demo ‘client’ has buttons for cloud features to allow it to upload files from a URL or DropBox and send a completed review back to a server – however, these features are not yet supported on the server.
The screenshots below are of the original web app prototype and should help illustrate some of these ideas.
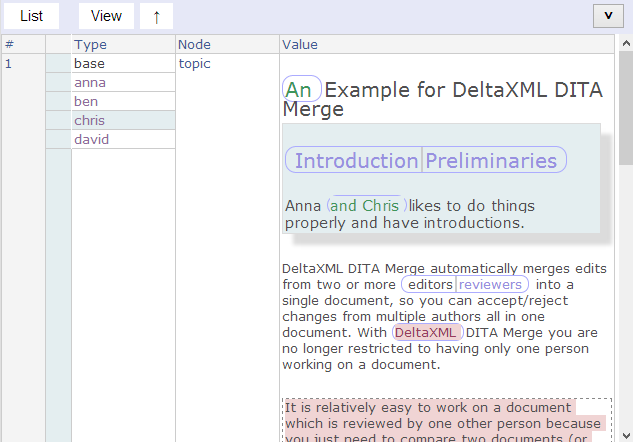
Topic with anna selected
This view shows the DITA topic with anna selected to highlight just anna’s changes. Here we see that she’s added content (blue background) within an area representing a new element, new elements have a solid outline with squared corners and a drop-shadow. It is evident that other revisions have also added content here, because the ‘Preliminaries’ and ‘and chris’ parts are not highlighted. The text part (outlined with rounded corners) ‘DeltaXML’ has a background color of red, showing that anna deleted this text.

Top-level view of DITA topic with anna selected
Topic with chris selected
Here, chris is selected. We now assume that chris actually added the blue-highlighted element first (the element has a blue background because more content is owned by chris within the element). There’s a text-part ‘DeltaXML’ (with red-background and rounded-corners) deleted by chris, but we can also see an element has been deleted by chris that has a squared-outline with red background.

DITA topic with chris selected
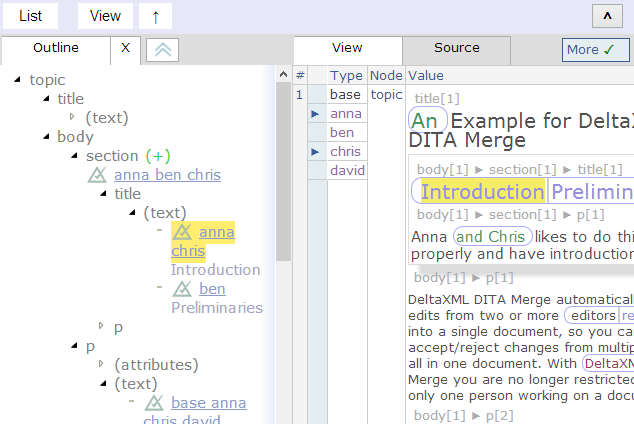
Topic with text-part selected
The ‘Introduction’ text part has been selected here, pointers are shown adjacent to anna and chris to show that they own this change. The text-part outline is split with ‘Preliminaries’ in the other half, a pointer next to ben is shown when the mouse is hovered over ‘Preliminaries’, telling us that he disagreed with anna and chris.

DITA topic with conflicting text-part selected
Selecting the topic element
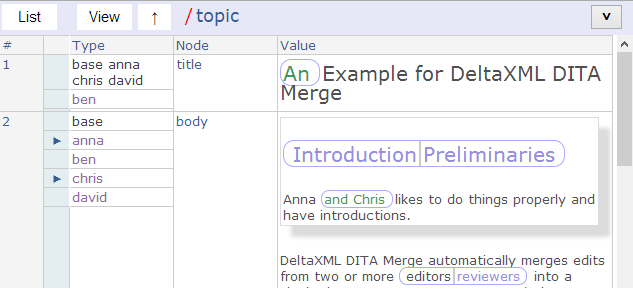
Until now we’ve been reviewing the document at the ‘root level’ and haven’t looked too much at document structure. In previous views, the 2nd column of the view (titled ‘node’) was marked topic, selecting this results in the view shown below.
The view is now split into two rows, one for each child element of topic, that is, title and body. The owner groupings are shown separately for each row so that we can now see that, for the title, ben is in a group on his own, we can therefore easily surmise that ben must be responsible for the new ‘An’ text group (green foreground color) in the title. Also, the first group shown always includes base and text parts associated with the base always have a black foreground color.
One further thing to note from this view is that the header bar now has the text /topic – indicating the view is now in the context of the topic element.

View with DITA topic selected
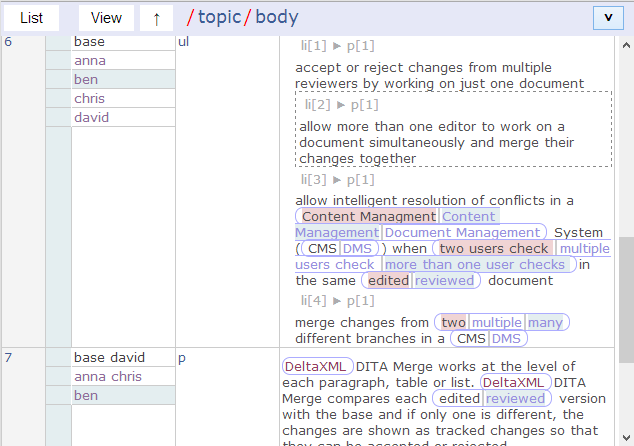
Ben selected in the ul and p elements of body
It’s now time to dig a bit deeper and select the body element, so that we’re looking at one row for each body element child. Each element now has its own set of owner-groups displayed to the left. In this view, I’ve scrolled down to the ul and following p element, and then selected ben in each so that we can now see ben’s changes for each element.
This view has the option to show the context of each block-level eleemnt enabled, so for example we see li[3]  p[1]
p[1] to tell us that we’re looking at the 1st p element within the 3rd li element of the ul element, the header bar now also shows topic/body to show the context of the view also.
There’s a good example of a simple conflicting change to a text-part in the 4th li element shown in the view. In this, ben has modified ‘two’ to be ‘many’ but this conflicts with anna as she changed the same text-part to be ‘multiple’ (discovered anna was the owner by hovering the mouse of the ‘multiple’ part).

View with the DITA topic/body selected
Tree Views
While tree-views are efficient for navigating a document hierarchy, many end-users don’t like such views as they prefer to consider authoring a narrative stream rather than a tree, for this reason its probably best to leave such views hidden, except when required. The nodes of a tree can be annotated to show where elements or attributes have been added – this is illustrated in the view below.
Here we get confirmation that it was a section element that was added by anna, ben and chris, and that ann and chris agreed on the title being ‘Introduction’ but ben chose ‘Preliminaries’.

The title text-part selected from the document tree
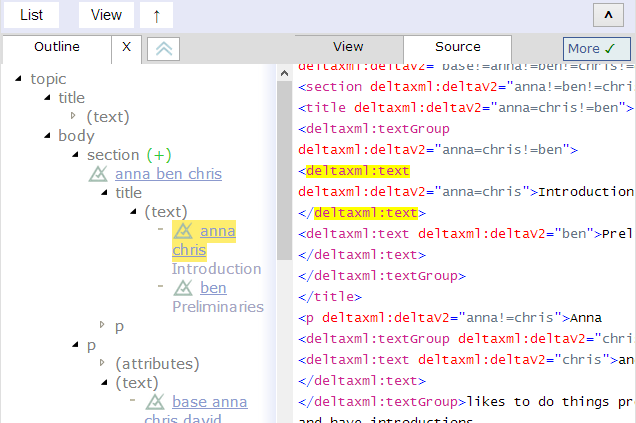
Source code view
This is definitely not for end-users, but it may be helpful for the XML developer to see the raw XML code with reference to a selected part of the view, so I included this view in my prototype just for this reason. Selecting from the tree-view highlights the associated XML code or vice-versa.

Source code view
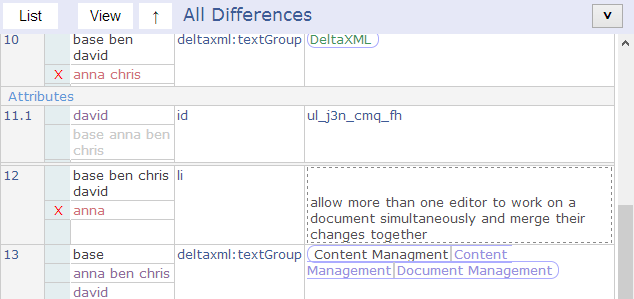
View a list of changes
An alternative to seeing changes in place within the document is to include a separate list of all the changes. With this, selection of each specific change in the list will show that change in the document view. It might also be useful to have a way of filtering a list of changes, so only certain types of changes are shown in the list, I included a very rough capability in the prototype design for this… just enough to show there is real potential in this approach.
One benefit if a list of changes is it makes it easier to show attribute changes, in this view we can see that david added a new id attribute with the value ul_j3n_cmp_fh.

Listing the changes from all revision documents
The video
Its difficult in a static blog post to give a feel for the dynamic behaviour for a document reviewing prototype, so I’ve included a very short (less then 2 minutes) video below that should give some idea of this.
[THIS VIDEO IS NO LONGER AVAILABLE]
Summary
This document-review scenario would have been time consuming and error prone without using DITA Merge to collate difference information about all the revisions into a single file. While this was the critical first step, a further important stage was required to present this information in a format that could be readily interpreted by the end user.
Documents are not code. There are many obvious differences between merging code and merging documents, but some subtle ones also: if a mistake is made when merging code there are many automated ways of detecting this, ranging from compiler errors to formal unit-testing. Conversely, with documents, a visual inspection will almost always be required; just because document parts don’t appear to conflict, (and still conform to DITA rules in this scenario) there is no guarantee that a change in a title (or even the way it is rendered) in one part of the document can leave another part redundant or invalid.
In this post I’ve concentrated on ideas for providing visual help when reviewing multiple changes to a document, the process of actually accepting changes and absorbing them back into the original document is another subject area. It may be that for such a process you would use similar ideas for presenting changes, but there are alternatives that may work even better, and I hope to discuss these in future posts [update: see oXygen Merge Resolver article].


 p[1]
p[1]